Tenable.io: To control or not to control, that is the question

For large deployments of Tenable, where Tenable.io is shared across geographical or business boundaries, you can leverage role-based access control (RBAC) to logically segment scan data or, where required, restrict access to its scan data. In this blog, we’ll explain the configuration required to implement RBAC successfully.
When Tenable.io is used by multiple users to build your vulnerability management program, there are two schools of thought.
Option 1: Let all users see every vulnerability, while allowing them to narrow their focus on a subset of assets using custom dashboards in conjunction with Tenable.io tag filters.
Option 2: Align closer to a zero trust model by leveraging role-based access control (RBAC) within Tenable.io to logically segment and restrict visibility to a subset of assets and/or resources.
The first option is very simple to achieve so we won’t focus on it in this article. Instead we will focus on the second option and the configuration of RBAC best practices. All actions outlined below will need to be configured using a Tenable.io administrator account.
Full Tenable.io RBAC segmentation is controlled in multiple locations in the Tenable.io interface. These locations include segmentation based on the sensor network, user access control permissions and scan policy permissions. In each section we will outline why and how to implement these features.
We will use the following scenario to explain how to configure Tenable.io with RBAC. We will assume four regions/business units. Each region will manage their own scans, but will have no access to any other regions’ results or their associated scanners. Full administrators will have access across all regions for central reporting, visibility and configuration. Full access will be authorized to an API user to enable integration with third-party solutions.

Before configuring RBAC, we need to build the foundation it will be applied to. This includes network segmentation and tagging.
Sensor network segmentation
When leveraging a single Tenable.io container across multiple regions/divisions, a key issue you can face is overlapping IP addressing. To disambiguate between assets that have the same IP addresses across environments, use sensor networks in Tenable.io.
Tenable.io sensor networks allow you to segment regions/divisions for each environment, and assign scanners and/or scanner groups to each network. When an asset is scanned, the associated network is added to the asset's details. You can filter assets by network or create dynamic tags based on a defined network. A scanner or scanner group can only belong to one network at a time.
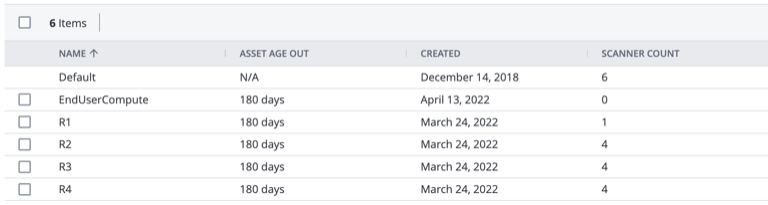
In this scenario, we will be creating four sensor networks – one for each region – then we will deploy Nessus Scanners into each region/organization.
Do this by following these steps:
Menu > Settings > Sensors > Network > Add Network
In each region/organization you can then deploy one or more Nessus Scanners and/or Nessus Agents to their relevant sites. Scanners should always be deployed as close as is practical to the targets you want to scan. Once a Nessus Scanner is bound to a sensor network, any asset discovered or scanned by that scanner will be bound to that sensor network.
To ensure only the appropriate regions’ staff can see and schedule scans on their Nessus Scanner(s) it is important that the scanner permissions be updated to meet this requirement. You also need to make sure the correct role is assigned against the user, a topic we cover later.
As administrator, select the Nessus Scanner from the “Linked Scanner” page, go to the “Permissions” tab and ensure “Default” is set to “No Access” and assign the appropriate access required.
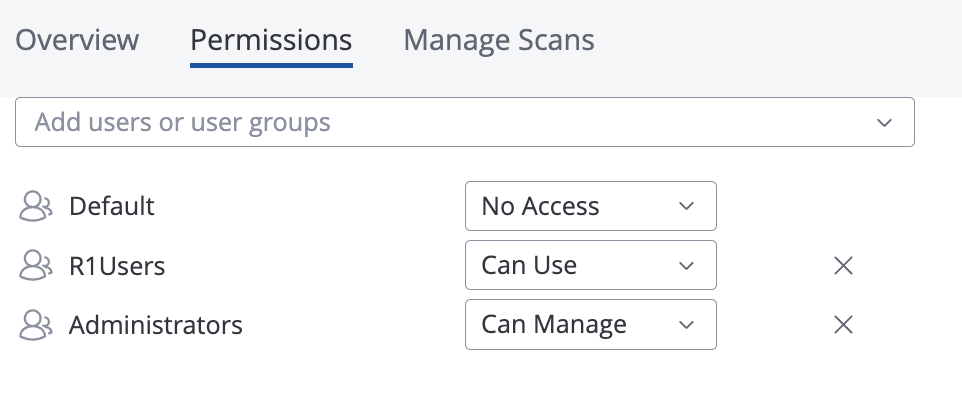
For a scanner deployed in Region One we would recommend:
Default=No Access, R1Users=Can Use, Administrators=Can Manage.
Applying automatic tags based on sensor network
To leverage RBAC, filter dashboards and so on, we leverage tags within Tenable.io. Tags can be automatically assigned based on the sensor network.
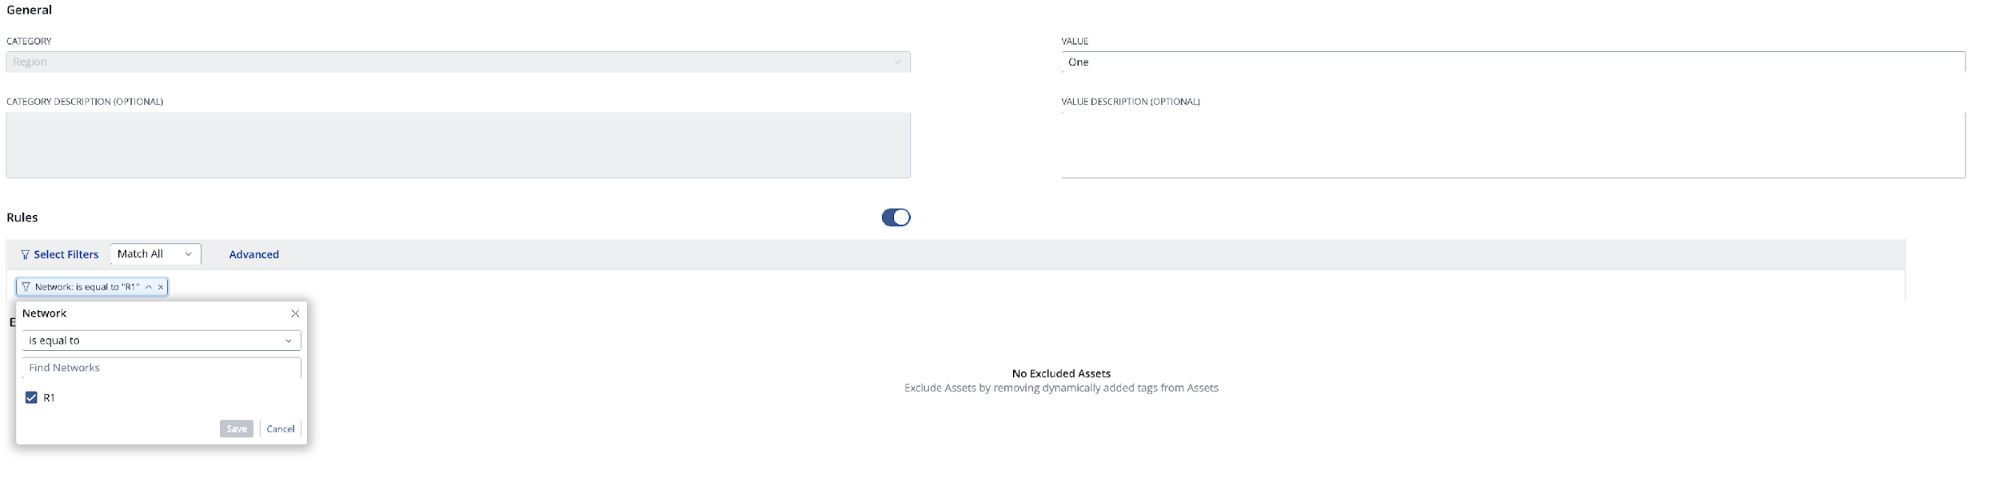
In this scenario I have created a tag category called “Region” and then a value for each of the regions. The regional tags will be automatically applied based on the sensor network that the asset belongs to. Tags could be used to group targets associated with different business units, locations, remediation teams, and so on.
For example:
Tag Category “Region” with Values “One, Two, Three, and Four”

You can configure tag rules to automatically apply the relevant tags. For example, tag “Region:One” is to be applied to any asset where the sensor network is equal to “R1”.
This logic would be applied to each sensor network region (R1, R2, R3, R4.) Any asset discovered or scanned using a Nessus Scanner or a Nessus Agent would then automatically have the relevant tag assigned. (Note: The tag is applied to Nessus Agents after their next scheduled scan is processed – not when they are first linked to Tenable.io.)
RBAC configuration
RBAC is implemented as a combination of roles and permissions.
Roles:
Tenable RBAC is configured in multiple locations. RBAC will be heavily bound to the tagging model defined above.
The recommendations in this section will cover settings for:
- Settings > Access Control > Roles
- Settings > Access Control > Permissions
- Settings > Access Control > Groups
- Settings > Sensors > Cloud Scanners > Permissions
- Settings > Sensors > Linked Scanners > Permissions
- Scans > Manage Scan Templates > {template} > User Permissions
In Tenable.io, roles allow you to manage privileges for major functions and control which resources users can access. When you create users, you must assign them roles that broadly determine the actions they can perform.
For this example, we want regions/business units to create their own scans so we will leverage the “Standard” role. If you want to lock that down further so only defined scan templates can be used, then “Scan Operator” is the better fit.
The recommended settings are based on the following persona matrix within a large organization:
| Administrators | Have full administrator privileges over the Tenable.io platform |
| Organizational Users | Can view all results for every region/business unit but have no admin rights |
| Regional Administrators | Can manage their regions' scanners and scan policies, and see all related results |
| Regional Users | Can view all results for their region/business units but have no admin rights |
|
API Users |
Can query data from all regions/business units |
Tenable.io built-in Roles :
| Role | Description |
|---|---|
| Administrator | Administrators have the same privileges as the Scan Manager user, and can also manage users, groups, system target groups and access groups. Additionally, administrators can view scans created by all users. |
| Scan Manager |
Scan Manager users have the same privileges as the Standard user, and can also manage agents, exclusions and scanners. Note: Users with the Scan Manager role can see all scanners, not just the ones they have been given rights to see. |
| Standard | Standard users can create scans, templates and user target groups. |
|
Scan Operator |
Scan Operator users can create and run scans based on templates which the company has authorized. |
| Basic | Basic users can only view scan results and manage their user profile. |
| Disabled | Disabled user accounts cannot be used to log into Tenable.io. |
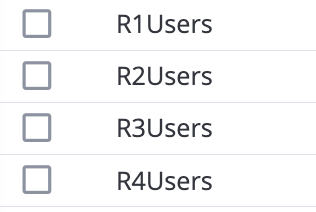
Tenable RBAC is implemented as a combination of Roles and Permissions. To restrict visibility of assets and results, we will create four User Groups (R1Users, R2Users, R3Users and R4Users). Once the Role and Group(s) are defined you can create a Permission set for the users.
In our scenario we will restrict the assets based on the tags we configured earlier.
Here’s an example:
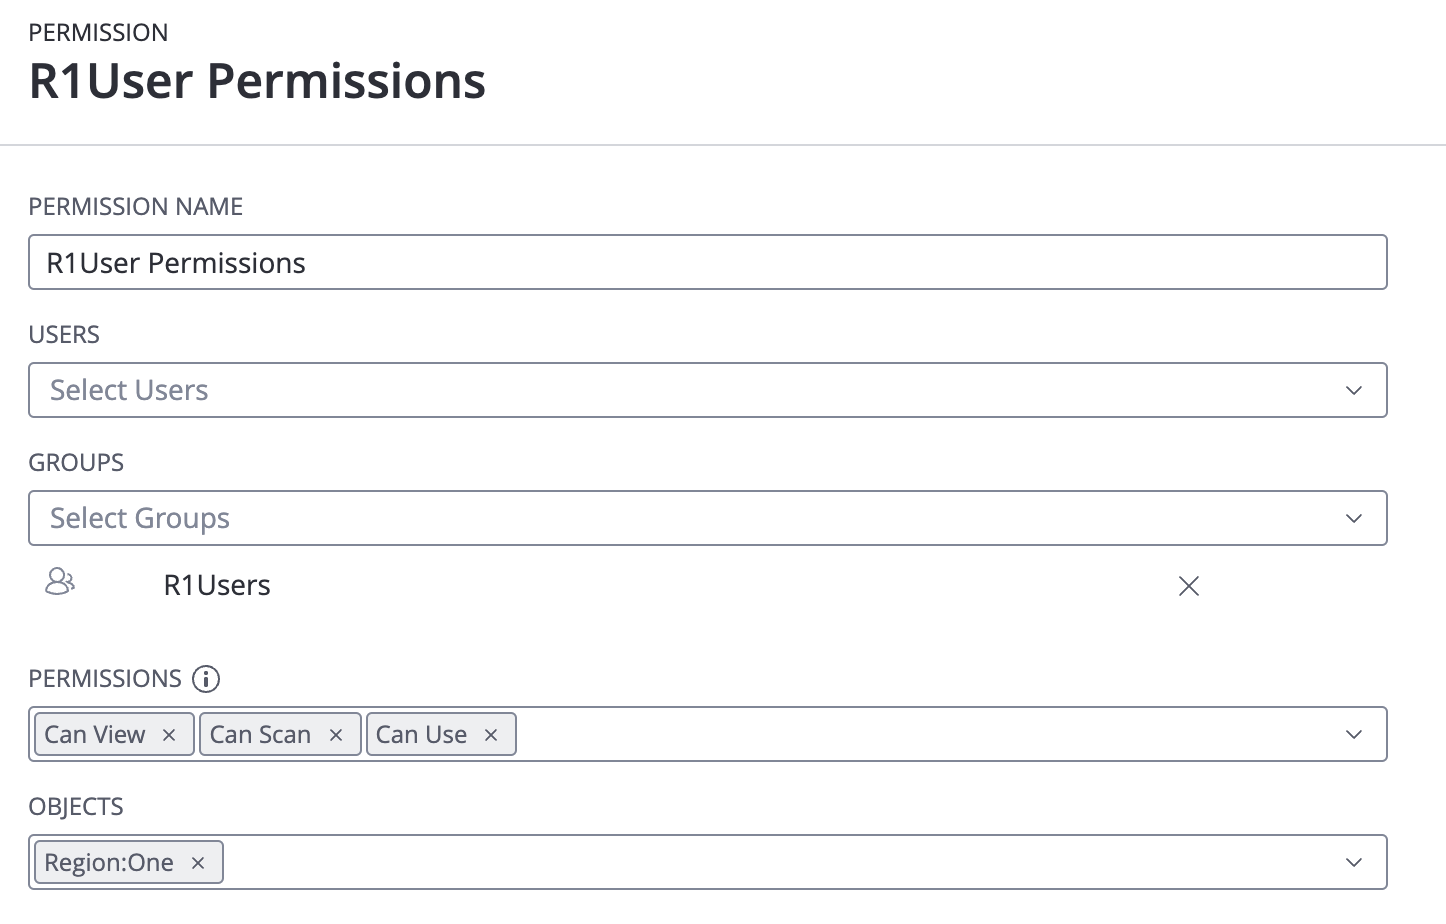
“R1User” permissions are assigned to the ‘R1Users Group’
Added Permissions: Can View, Can Scan, Can Use
Assigned Objects: Region:One
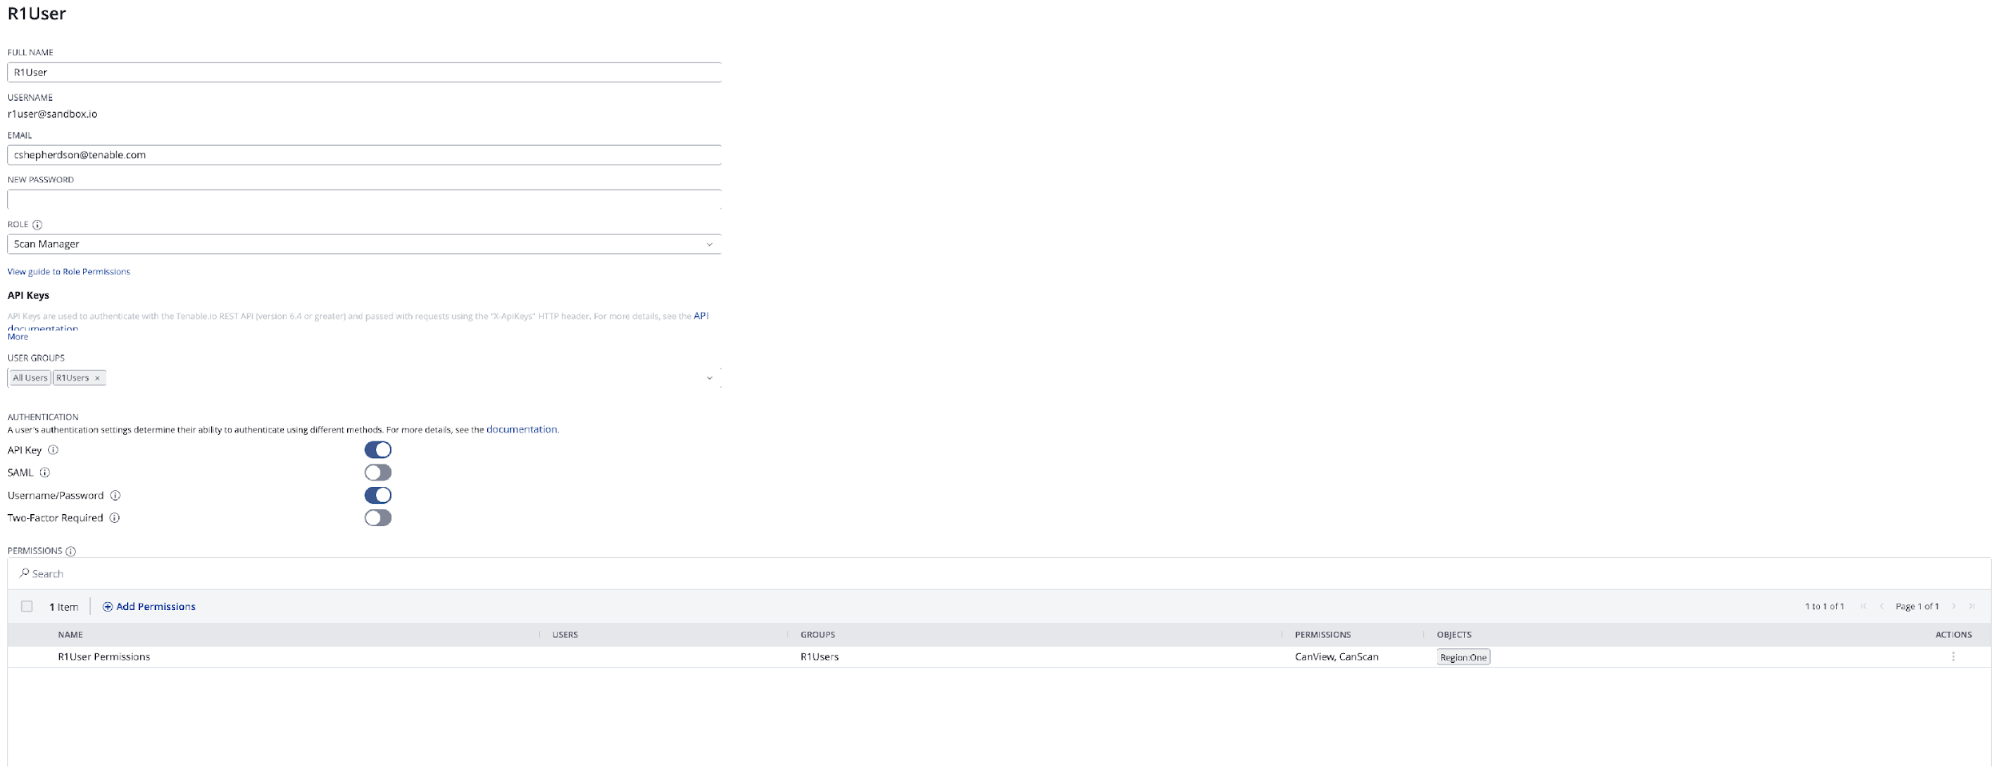
Lastly we will create the user profiles and add them to their relevant User Group.
For example User “R1User” is created and added to the “R1Users” Group
(Note: For existing customers who are using access groups for their access management, Tenable.io is replacing access groups with permissions.)
It is important to remove the “All Assets” permission set, and remove any reference to “All Users” from any of the permission sets. This ensures that only administrators have visibility into all assets and that users will only be able to see their tags and relevant assets.
Based on the Persona Matrix, the following would be recommended:
| Role | RBAC Category | Recommended Setting |
|---|---|---|
| Administrator | Role | Administrator |
| Permissions |
All tags: Can View, Can Scan, Can Use, Can Edit |
|
| Note: Admin rights are implied (no specific policy required) | ||
|
Enterprise Users |
Role |
Basic |
| Permissions | All tags: Can View, Can Use | |
| Organizational Admins | Role | Scan Manager |
| Permissions | Region{x} Tag(s): Can View, Can Scan, Can Use | |
| Note: This can be locked down further by using the Scan Operator role, which restricts access to only using approved scan templates. | ||
| Organizational Users | Role | Basic |
| Permissions | Region{x} Tag(s): Can View, Can Use | |
| Enterprise API Account | Role | Administrator |
| Permissions | All tags: Can View, Can Use | |
|
Note: Even though the account is a full Administrator, you do need to specifically allow rights to access data via the API. The API user should not have access to the Tenable.io UI. Ensure only API authentication is enabled on this account. |
Additional Permission changes:
To ensure all users can only access authorized data you will need to find the permission entry listed against “All Assets” objects and remove the “All Users” group. For the permission set, only users or groups who are authorized to view all assets should be listed.
Additional Role configuration options:
Tenable.io Roles can be further customized to control access to other capabilities. These include the ability to:
- manage recast/accept rules for a vulnerability
- view recast/accept rules
- view capabilities in Tenable.one
- create Exposure Cards in Tenable.one
- manage Tags in Tenable.one
Note: The Tenable.io RBAC policies continue to be updated with further user controls.
Scan policy permissions
Outside of RBAC policies, a user/group can be given access to see scan results from within the scan policy permissions. To ensure that access to scan results is not exposed to unauthorized users, configure scan policies with the “Default:No Access” policy. If this is not in place and a scan policy is shared, then a restricted user can still click on the scan and see all the scan results. This is true for both vulnerability and web app scans.

How these RBAC controls will effect dashboards
When you log in with a restricted user, for example “R1User”:
- Assets will be restricted to only those with the “Region:One” tag.
- Vulnerabilities will be restricted to the assets with the “Region:One” tag.
- When building dashboards or applying filters based on tags, you can only select the tags that have “Can Use” permissions on them.
- Web application dashboards do not populate for restricted users. If they need to see scan results you can edit “Scan Permissions” to provide visibility.
- In Lumin, the “Organizational CES” score and metrics are displayed. The “Business Context” section can then be configured with the tags the user has access to. “Business Context/Tag” can be used to focus any of the Lumin metrics onto the relevant regions/tags assets.
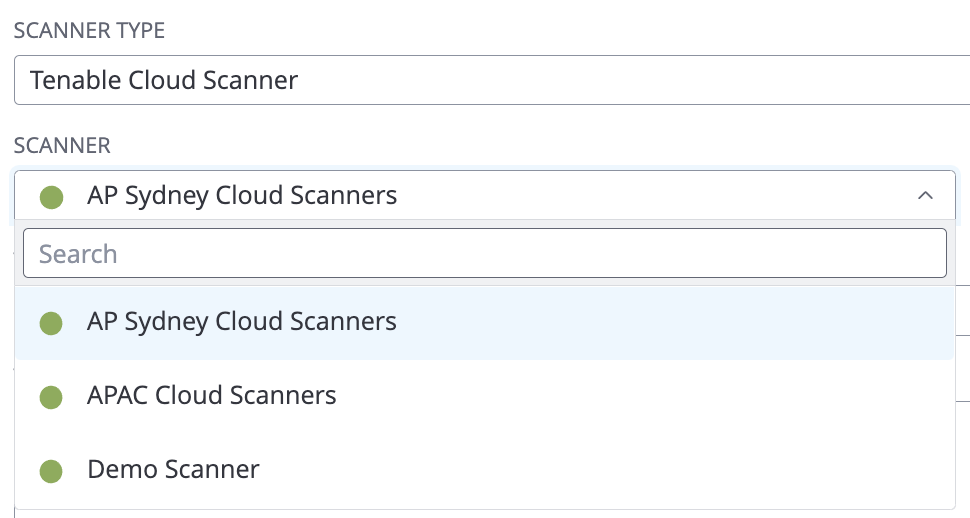
| Full Admin User | Example of restricted User "R1 User" |
|---|---|
 |
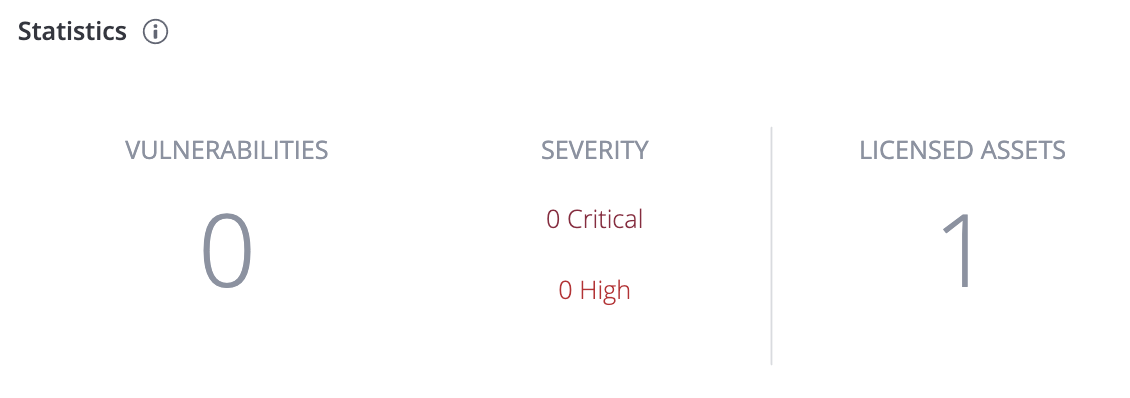 |
 |
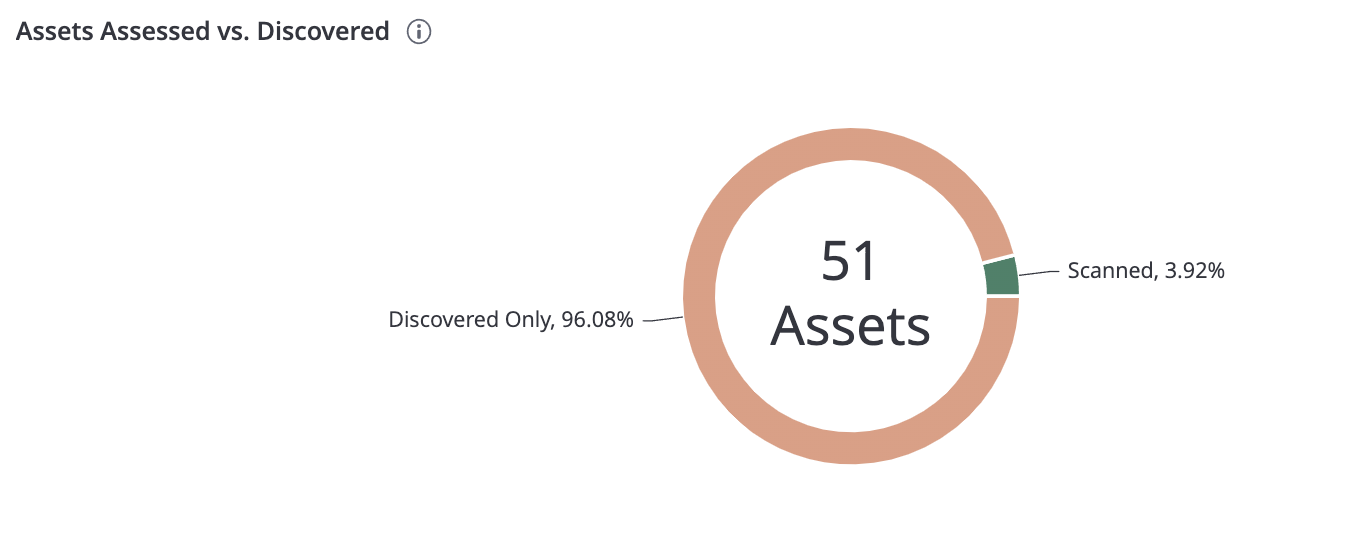 |
 |
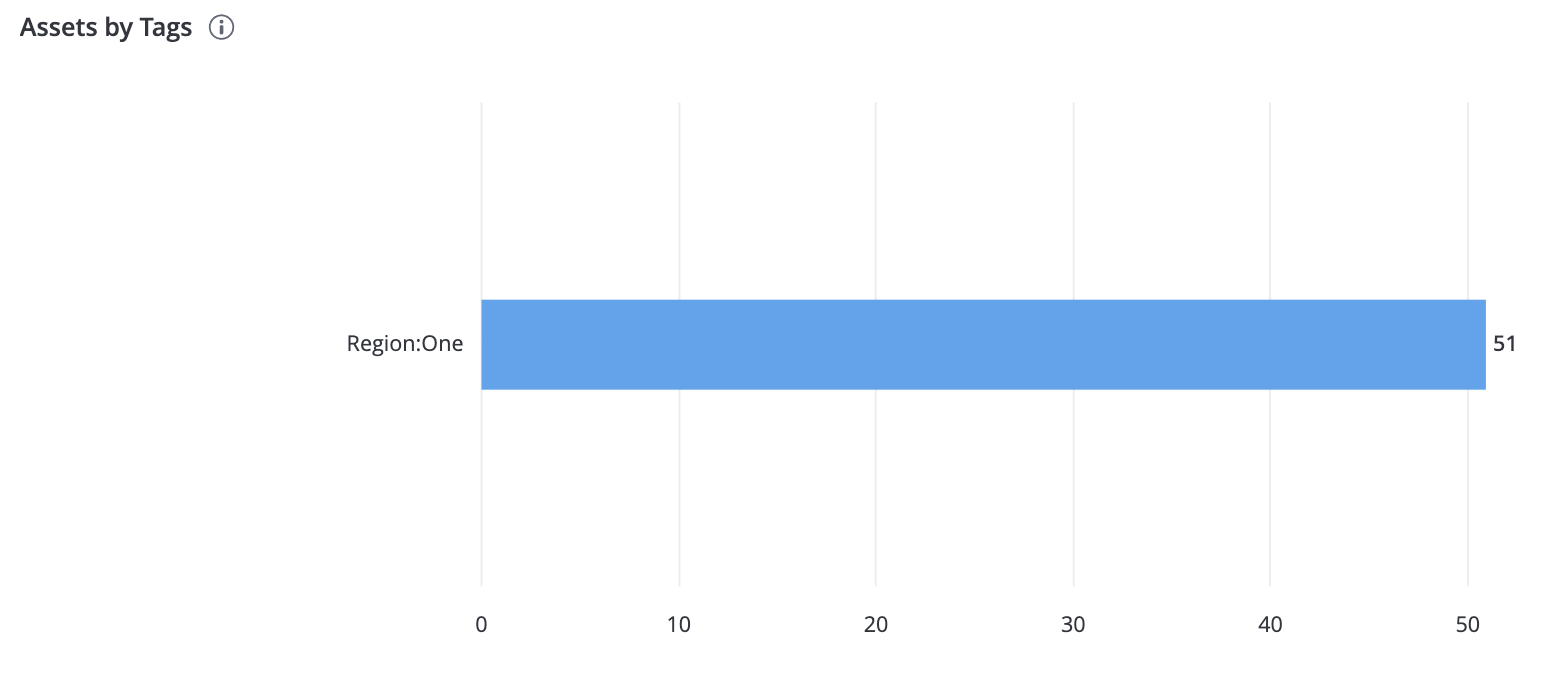 |
|
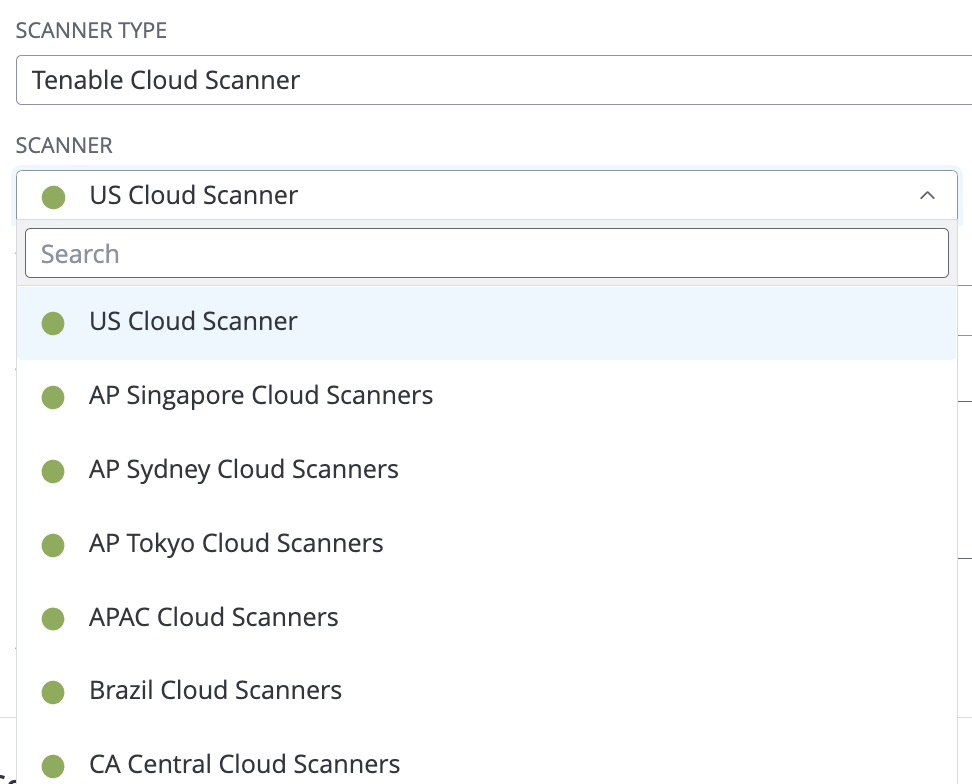
Available scanners
|
Available Scanners
|
Lumin (top view shows organizational metrics)

Tags can be leveraged to show regional metric breakdown

Conclusion
Tenable.io has a robust RBAC capability that can enable you to apply restrictions on everything from the targets and associated weaknesses that a user can see, to the ability to create/schedule scans and what Nessus Scanners are available to them.
Tenable.io RBAC heavily leverages tagging to logically define boundaries that restrictions can be placed around. Make sure to use the automation logic in Tenable.io tags as much as possible to easily maintain the tags assigned against each target asset.
You can find more information here:
Learn more

Learn more
Related articles


- Tenable Vulnerability Management
- Vulnerability Management
Tenable One
Request a demo
The world’s leading AI-powered exposure management platform.
Thank You
Thank you for your interest in Tenable One.
A representative will be in touch soon.
Form ID: 7469
Form Name: one-eval
Form Class: c-form form-panel__global-form c-form--mkto js-mkto-no-css js-form-hanging-label c-form--hide-comments
Form Wrapper ID: one-eval-form-wrapper
Confirmation Class: one-eval-confirmform-modal
Simulate Success